Getting started with Java
Overview
Teaching: 30 min
Exercises: 30 minQuestions
What is Java?
How do I create my first Java program?
Objectives
Understand how Java and the JVM run.
Compile and run your first Java program
Selecting your environment
Hello World is a common and basic first step into programming but this tutorial is about more than the code - it’s about your programming environment. Understanding your programming environment will enable you to be more efficient, understand your workflow and solve problems that you encounter during integration and deployment of your code. There are many choices for your Java development environment and lots of people have strong opinions on which options are best (some call it a war). We’re going to start with a text editor; I recommend starting with Notepad++ although I use Atom.
Once you get started programming, you will soon find that you are generating syntax errors in your code at a faster rate than you can keep up with while executing code from the command line. This is important at first so you can identify the source of your errors, however, at this point you may also want to try an IDE (integrated development environment). An IDE handles much of the packaging, integration and deployment phases of the build lifecycle which also means it can give you prompts about syntax errors in your code and you don’t have to run code from a command-line interface (CLI). A word of warning though, IDEs can cause as many problems as they solve. Once a project becomes sufficiently complex, an IDE can cause dependency conflicts and allow errors to quietly persist. Netbeans is my IDE of choice so if you want to get ahead that is what I’d recommend.
Running Java in the command-line
This workshop aims to give you some experience of using the command-line and a text editor for writing straightforward Java programs. If you have any difficulties or don’t understand what you are supposed to be doing or why you are doing it, please don’t hesitate to ask for help in the workshop.
To start, we’ll execute statements in the command-line interface (CLI a.k.a. terminal) to help navigate this interface. Follow these steps:
Windows:
Get a command window by selecting “CMD” from the “All Programs” section of the Windows “Start” menu in the bottom left hand corner. A shortcut is to search for ‘CMD’ and you should find the command prompt.
Top tip: Powershell is a similar command-line interface on all modern windows distributions with a slightly richer environment and better usability features.
Mac:
In applications you will Press cmd + space bar and search for ‘terminal’.
Top tip: The mac terminal is basically the same commands as a linux command-line interface so if searching for answers online you can often apply answers intended for linux users.
Linux:
Open the terminal. If you’re on a linux machine and don’t regularly use the terminal - you’re probably using the wrong OS.
The text before the prompt (C:\ or a drive name in windows) tells you the “drive” (or device) and the directory (folder) that you are in. The command-line is a way of interacting with the computer. It allows you to invoke programs by typing their names, and is the traditional way of interacting with computers. We are going to use it because it makes clear the distinction between the computer (running Windows), the Java tools (javac and java runtime environment), and your Java programs.
A couple of useful commands for the console are:
dir or ls - This shows you the files in the directory or folder that you’re currently in. You’re probably used to looking at these with Windows Explorer, but the same information is (less prettily) available with dir.
cd Short for “change directory” allows you to change your current directory to another. If in your current directory you have a sub-directory named java, you can change to it with the command cd java. You could then see what files are in it with the command dir. The command cd by itself prints the current directory.
Directories are arranged as “trees” as is obvious from file explorers. Thus each directory can have several sub-directories (children), but only one parent directory. You can change to the parent using cd ..
At the command prompt, type:
java -version
You should see the Java version mapped to your environment path printed. If you have a version 1.8 (Java8) or higher you’re good to go otherwise if you see “java: command not found.” you’ll need to download and install a recent Java.
To install the Java JDK follow the link below:
[https://www.oracle.com/uk/java/technologies/javase-downloads.html]
Hello Java
Fire up your text editor - start Notepad++ by selecting it from the main Windows menu. 2. You should an icon that looks like:

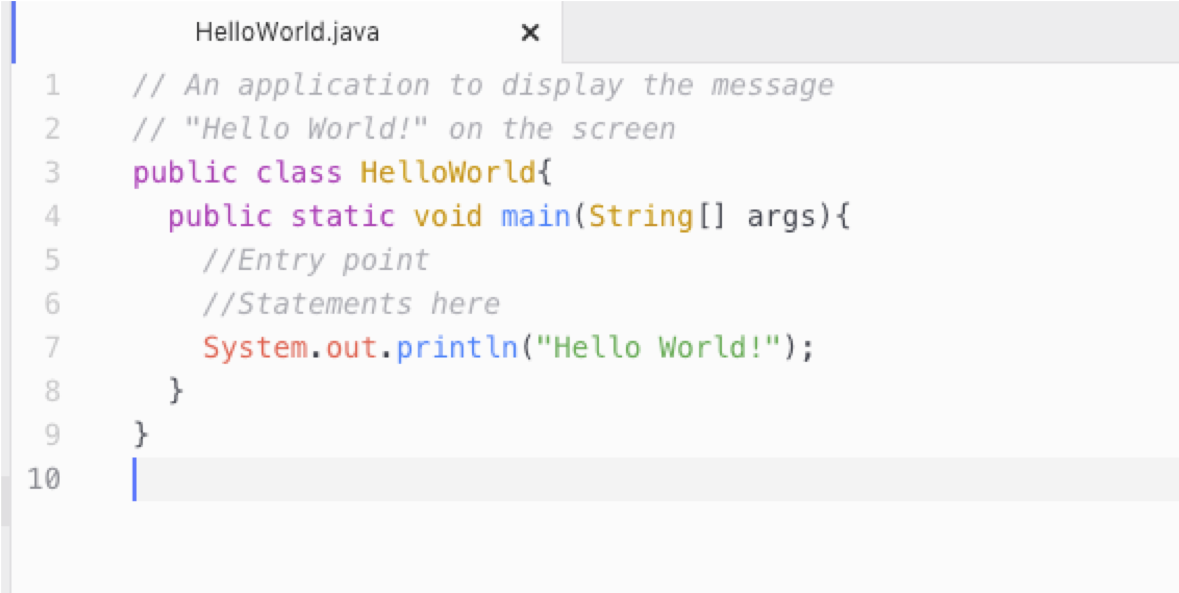
In order ensure that Notepad++ treats your file as a Java program, use the “Save As” menu to save the (empty) file as a java file (say HelloWorld.java). The .java extension is important, but you can choose whatever name you like; remember the naming conventions lesson - make the name as simple as possible, start iwth an upper case letter and use snake case. Make sure you know which folder you saved the program in. It’s probably best to make a new folder for your PiJ (Programming in Java) work. Once you’ve set the default program to Notepad++ it will then treat all your files in this session as Java; if you open a file with the .java extension, it will automatically be recognised as Java. 4. We’ll start by writing another very short program. Use the editor to write these three lines (but use your own name instead of ’Eric the Unready’):
// An application to display the message
// "Hello World!" on the screen
public class HelloWorld{
  public static void main(String[] args){
    //Entry point
    //Statements here
    System.out.println("Hello World!");
  }
}
Notice that the editor colours the variables, strings and keywords differently to help you distinguish between them. Save your program to a file - well done you have created a Java class! Your text editor should look something like this:
In the command window, navigate to the directory where you saved the program and check that it’s there. (Recall the notes on cd and dir or ls.) Here’s an example where the file HelloWorld.java is saved and listed in the current directory; you can choose a different directory, of course.
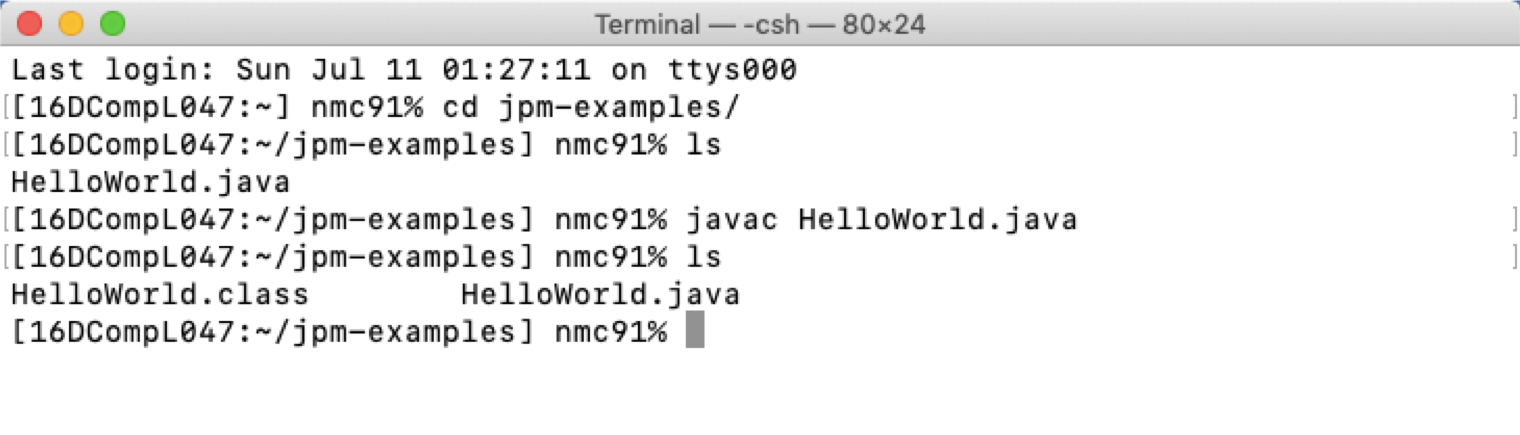
As shown in the above picture, you will first need to compile the program by typing (at the command prompt (>) in the console):
javac HelloWorld.javaIf this step is successful you should notice that a new file HelloWorld.class has appeared in your current directory. This file contains the java byte code to run your HelloWorld program. Finally, the next step is to use the Java Runtime environment to run your program with the command below:
java HelloWorldIs the output what you expected?
Editing a Java module
-
Attempt to change the HelloWorld program to print “Hello Java workshop” and try compiling and running it again. Also check-in with others in the workshop before progressing on to the last individual task.
-
Download and run the GreenBottles.java. Find the variable that controls the starting number and change the program so that it starts with 20 green bottles. Modify it again so that it starts with no bottles and counts up to 10 bottles in steps of 3; that is, 0 green bottles, 3 green bottles, 6 green bottles, 9 green bottles.
-
Go back and modify your HelloWorld program to enable it to use command-line arguments. The code below briefly shows how this can be done. Speak to the workshop lead at this stage to work through how this can be done.
System.out.println( args[0] ) </pre>java HelloWorld Matt Hello Matt, it's nice to meet you## Optional programming challenge - if you've programmed before! If you manage to complete all the tasks ahead of others either lend a hand to help debug any issues they're having or have a go at the coding bat warm-up exercises. [https://codingbat.com/java] That's the end of this practical sessison. Most others will be less wordy and more coding but if you have any questions, as always, just ask. Happy coding!
Key Points
Java is a general purpose, high-level, compiled, strongly typed, object oriented programming language
Variables and assignment in Java
Overview
Teaching: 45 min
Exercises: 15 minQuestions
What are the primitive types in Java?
How do I store literal values in a Java program?
Objectives
Understand the Java primitive types.
Create Java programs that capture variables
Key Points
Java variables
Conditional logic in Java
Overview
Teaching: 30 min
Exercises: 30 minQuestions
How to implement branches and decision points in Java contorl flow?
How do I use if statements?
Objectives
Understand the if statement syntax.
Apply operator logic to resolve scenario based problems.
Conditional logic exercises
- Recall that the we can use command-line arguments from args[] which are passed as an array of String variables.We can also use a prompt and take input from the user. So for example:
Scanner sc= new Scanner(System.in); //System.in is a standard input stream.
System.out.print("Enter a string: ");
String str= sc.nextLine(); //reads string.
System.out.println("Here is what you entered: " + str)
Create a simple program, HelloMatt, that asks the user to input a name then prints “Hello “ + name unless the name is ‘Matt’. If the user inputs ‘Matt’ print ‘Hello Matt the programmer!’.
Note, the == boolean comparator does not work as you might expect for the String class so try using .equals() method.
- Note that the Scanner object (with System.in) does not return anything until the user presses return or enter. Note also that the input always returns a string, even if you enter a number. You can convert the entered number into an int using Integer.parseInt( input ).
Consider the following hypothetical scenario: A government decides to simplify the income tax regulations so that the amount of tax a person pays depends solely on their taxable income. The tax rate paid is then defined by the table below.
| Taxable income | Tax rate |
|---|---|
| Up to $11,000 | 0% |
| $11,001 to $43,000 | 30% |
| $43,001 to $150,000 | 40% |
| Over $150,000 | 55% |
Note, the current UK system is more complicated.
if statements can help detect the boundaries of the tax brackets. Write a program, TaxOwed, that uses if statements to calculate and print the amount of tax that should be paid by a person with the given income. Use System.in and the Scanner class to ask the user for an income for which your program will then print the amount of tax owed per year.
Solution link
- Write a program Odd that asks the user for a number and prints true if the number is odd. Test your function on the following values 1, 2, 3, 4, -2, 2.5. Note, you may want to use defensive programming and input validation.
Key Points
Java is a general purpose, high-level, compiled, strongly typed, object oriented programming language
Loops in Java
Overview
Teaching: 30 min
Exercises: 30 minQuestions
How do you use loops in Java?
How do you use if statements in Java?
Objectives
Understand the control flow constructs available in Java.
Apply a range of conditional logic and loops to solve a variety of problems.
A common requirement in programming is to repeat an operation several times. A good way to achieve this in Java is with a for loop. To repeat something, say, 10 times you can use the following construct:
for (int i=0;i<10;i++){
  System.out.println( i )
}
This code prints the numbers 0, 1, 2, …, 9 on separate lines. Here the loop variable ‘i’ is set equal to 0 and the print statement executed; it is then set equal to 1 on the next iteration of the loop and the print statement executed again; this continues until ‘i’ is 10 at which point the loop terminates without printing that value.
Loop exercises
- Create a program ‘PrintN.java’ that takes two command-line arguments; assume the first argument is a word and the second argument a number. Print the word of the first argument the second argument number of time. Use a ‘for’ loop to write this version of this function.
Here is an example of the output you should expect:
$ java PrintN Hello 3
Hello
Hello
Hello
- Earlier you adjusted a while loop in GreenBottles.java to change the number of iterations. Adapt the GreenBottles.java program to use a
forloop instead of a ‘while’ loop.
- Write a program FactorialLessThan1m that, given a number num, calculates the factorial by multiplying the numbers 1, 2, 3, … , n and prints the value only if it is less than 1,000,000 otherwise it prints None.
- Given the array of integer numbers intArr below, write a program Squeeze.java that uses a for each loop and prints a list where all adjacent elements that are the same have been reduced to a single element, so squeeze([1, 2, 2, 3]) returns [1, 2, 3].
int[] intArr = { 1, 2, 2, 2, 3, 4, 4 ,5 }
-
Write a program SumPowers, that finds the sum of the first n natural numbers raised to the pth power; that is it prints the sum:
1p+2p+3p+…np
Take the first command-line argument as n and the second command-line argument as p.
Key Points
Java is a general purpose, high-level, compiled, strongly typed, object oriented programming language
Classes in Java
Overview
Teaching: 30 min
Exercises: 30 minQuestions
What are the principles of Object-Oriented Programming?
How do we create classes in Java?
Objectives
Explain the four principles of OOP.
Build an example Rectangle class.
JiP2.1-OOP-intro.pptx - slides download JiP2.2-OOP-classes.pptx - slides download
  [access privacy] [return type] [identifier] (type arguments) { ... }
  public boolean odd(int input){ ... }
Define a new method called oddSum that, given an array of ints, e.g. arr, as an argument returns the sum of the odd numbers using the odd method. Implement a third method in OddEven that returns the sum of the even numbers, invoking the oddSum method in the process. Test your function from a Main class extracting and printing the odd and even numbers from arr array. Remember a for loop iterates through each element in a list and variables for cumulative updates must be created before the loop.
int[] arr = [1, 42, -3, 2, 39]
for (int num : arr ) {
  //this for each loop iterates through each item in an array
  //do something with each_number
}
Solution OddEven.java Solution Main.java - see exercise 5
Write another method, firstDigit, that returns the first digit of its integer argument. Thus, DigitExtraction.FirstDigit(657) should return 6. Make sure that your program works for negative numbers too.
You may find the remainder operator or modulo operator useful. This gives the remainder when the left hand operand is divided by the right hand operand as below. Create a DigitExtract object in Main and test your functions there as well.
>>> 10 % 2
0
>>>11 % 2
1
>>> -10 % 3
-1
Solution DigitsExtraction.java
Solution Main.java see exercise 2
Key Points
Object-oriented programming is a programming paradigm that uses abstraction (in the form of classes and objects) to create models based on the real world environment
Objects in Java
Overview
Teaching: 30 min
Exercises: 60 minQuestions
How do we create and use objects in Java?
Objectives
Explain the constructs that enable us to use objects.
Build on the example Rectangle class with objects and a RectangleApp.
Rectangle.java and RectangleApp.java
- Create a new projecrt in IntelliJ following the menu options: File > New > Project. Then select Java and name the project ‘ShapesTutorial’.
- In the project right-click ‘src’. Select ‘New’ > ‘Java Class’.
- Create a class for Rectangle.java from the lesson which can also be downloaded on the link at the top.
- Create a class for RectangleApp.java the for which is also linked at the top.
- Compile and run the RectangleApp.java code using either the right-click “Run ‘RectangleApp.main()’” or Run > Run from the menu options.
- Read the code and make sure you understand what is happening. Discuss the code structure with your neighbour.
The this keyword
- In the Rectangle class, replace the second constructor with arguments as follows:
public Rectangle(double width, double height)
What changes should you make for the constructor’s body to set the local object attributes?
Hint: Use the this keyword to resolve the conflict between instance attributes and constructors’ arguments.
- In the third constructor’s body, currently the attributes (width and height) are initialized with two assignment statements:
width = w;
height = h;
Could you replace the above statements with one statement which calls the second constructor?
Hint: Use the this keyword again, this time to call the constructor.
Adding methods
- Add two methods, both are for zooming the rectangle, therefore, they share the same method name (zoom) but with different arguments, which is known as method overloading.
- The rectangle’s width and height are zoomed with the same factor, i.e., only one argument is required for the zoom() method.
- The rectangle’s width and height are zoomed with different factors, i.e., two arguments are needed for the zoom(int vertical, int horizontal) method.
In the RectangleApp class’s main() method, create one more rectangle (name it rect1) by calling one of the three constructors with any initial values. Then call the two methods you have created, test if the two methods are correct or not.
- Add a method for determining if two rectangles are overlapped or not:
public boolean isOverlappedWith(Rectangle r){...}
As discussed in the lesson, this must be an instance method, as we need create one rectangle instance to call this method whose argument is another rectangle instance. In the RectangleApp class’s main() method, test if the method is correct or not by using the two existing rectangle objects (myRect and rect1). You may either
boolean b1 = myRect.isOverlappedWith(rect1);
Or
boolean b2 = rect1.isOverlappedWith(myRect);
The output values (b1 and b2) for the above two statements must always equal, otherwise, your method must be wrong. Create examples Rectangle objects to check if your method is functional.
Access modifiers
- As mentioned in the lesson, a well-encapsulated class always hide their attributes to avoid the object’s state (or attributes) been directly changed outside of the class. To achieve this principle, we need set all the instance attributes private. Then provide public setter and getter methods to modify and view the attributes. Change the Rectangle class to a well-encapsulated class and note, you’ll need make corresponding changes to solve issues in RectangleApp.java.
Hint: Select ‘Code’ > ‘Generate’ > ‘Getters and setters’ from the IntelliJ menu options to auto generate the code.
private double width; // private attribute
public double getWidth(){ // getter method
return width;
}
public void setWidth(double width){// setter method
this.width = width;
}
// do similar changes for the other attributes
...
Circle.java and CircleApp.java
We previously learnt how to calculate the area and circumference of a circle by putting everything in the main() method in the CircleComputation.java file. Now let’s re-implement it in the object-oriented way. Similar to what you have done with the rectangles, you need first define a Circle class to encapsulate all relevant attributes and methods about a circle. Then add a test class CircleApp with a main() method to create circles and call all circles’ methods.
You may consider the following attributes, methods and constructors in the Circle class.
-
Attributes: (all set to be ’private’) – radius – originX – originY
-
Constructors: – no-arg constructor – a constructor with one argument (radius) – a constructor with three arguments (radius and originX, originY)
-
Methods: – Set the radius – Set the origin – Get the radius – Get the originX
- Get the originY – Compute the area – Compute the circumference – Move the circle. – Zoom the circle by a factor. – Determine if a circle is overlapped with another circle. - public boolean isOverlappedWith(Circle c)
Finally, compile and run your code creating some example circles to test if it works as expected.
Key Points
Object-oriented programming is a programming paradigm that uses abstraction (in the form of classes and objects) to create models based on the real world environment
Inheritance and Polymorphism
Overview
Teaching: 60 min
Exercises: 60 minQuestions
How do we use inheritance and polymorphism in Java?
Objectives
Explain the inheritance constructs and apply them in shapes.
Build on the example Rectangle class with subclasses and interfaces.
Polymorphism and inheritance
- Create three rectangles in the main() method as follows.
Rectangle rect2 = new Rectangle(10.0,5.0);
Rectangle rect3 = new Rectangle(10.0,5.0);
Rectangle rect4 = rect3;
Then use println() to print the three rectangle’s ‘value’.
System.out.println("rect2: " + rect2);
System.out.println("rect3: " + rect3);
System.out.println("rect4: " + rect4);
When run the program, you will see the output like this: Rectangle@7852e922, which is the class name together with the hashcode of the object in hexadecimal (you may understand it as the memory address for each object). You may see the hashcode of rect2 and rect3 are different, because whenever you new an object, the compiler will allocate a new block of memory for it. While you must have seen that rect3 and rect4 have the same hash code, because these two objects point to the same memory address. This means that whenever you change any attribute’s value for one object, the other object’s attribute value also changes. In another word, you may treat them as one object, but with two names (rect3 and rect4). Try the following statements yourself.
rect3.zoom(0.5);
System.out.println("rect3’s width: " + rect3.getWidth());
System.out.println("rect4’s width: " + rect4.getWidth());
Re-run it, you must see both rect3 and rect4 have been zoomed into half size.
toString() method
Every well-designed Java class should contain a public method called tostring() that returns a short description of the instance (in a return type of String). The toString() method can be called explicitly (via objectName.toString()) just like any other method; or implicitly through println() or print(). If an instance is passed to the println(objectName) method, the toString() method of that instance will be invoked implicitly. Now, add the following toString() method to the Rectangle class:
// Return a description of a rectangle in the form of
// Rectangle[x=*,y=*,w=*,h=*]
public String toString(){
return
"Rectangle[x="+originX+",y="+originY+",w="+width+",h="+height+"]";
}
Re-compile and re-run RectangleApp.java, you must have seen the outputs of the following statements are different.
System.out.println("rect2: " + rect2);
System.out.println("rect3: " + rect3);
System.out.println("rect4: " + rect4);
This is because if a class doesn’t have the toString() method, the compiler will output the default ”className@hashcode”1
. If a class has defined the toString() method, the compiler will output the form which you customize. As metioned above, you may call toString() method explicitly, just like any other methods:
System.out.println("rect2: " + rect2.toString());
Inheritance
You will have noticed that much of the code in Circle.java and Rectangle.java are duplicated. This is poor practice as it can lead to inconsistencies in the code through duplication.
- Refactor your code to create a class called Shape.java that contains all the common features of Circle.java and Rectangle.java. Consider if this should be a class, an asbtract class or an interface. Speak to the workshop leader if you are unsure which option to go for.
- Create an interface called Movable that includes one method public void move(double x, double y).
- Create a subclass that extends Rectangle called Wall.java.
- Create a subclass from Rectangle called Paddle.java that implements Movable. Remember: you will need to add the class specific constructors.
- Create a subclass from Circle called Ball.java that implements Movable.
- For each Movable class add additional class members to handle direction.
- Overload the overlaps method to overlaps(Shape s). Calculate the overlap for the relevant input class using instanceof.
Visualising the objects
- Add an abstract method to Shape called ‘public void paint(Graphics g)’
- Override this method for Rectangles with the code below:
public void paint(Graphics g) { g.setColor(Color.RED); g.fillRect(x, y, width, height); // Fill a rectangle } - Override this method for Circle with the following:
public void paint(Graphics g) {
 g.setColor(color);
 g.fillOval(x, y, radius, radius); // Fill a circle
 }
- Override this method for Rectangles with the code below:
- Create the following class to create a canvas with a paint method: `import java.awt.*; // Using AWT’s Graphics and Color
public class CanvasGUI extends Canvas { public void paint(Graphics g) { Rectangle r1 = new Rectangle(0, 400,20,100); r1.paint(g); }`
- Create a ShapeApp.java class with the code below:
public static void main(String[] args) {
     JFrame frame = new JFrame("My Drawing");
     Canvas canvas = new CanvasGUI();
     canvas.setSize(400, 400);
     frame.add(canvas);
     frame.pack();
     frame.setVisible(true);
 }
Key Points
Object-oriented programming is a programming paradigm that uses abstraction (in the form of classes and objects) to create models based on the real world environment
Data Structures
Overview
Teaching: 60 min
Exercises: 60 minQuestions
How do we use arrays, ArrayLists and HashaMaps to represent collections in Java?
Objectives
Build on the example Rectangle class with arrays, ArrayLists and HashMaps.
Array handling
Write a method called emailAddresses that takes two array arguments called first and last and an String argument called domain. The method should be declared in a class in a class called EmailFormatter.java.
Implement the method to use inputs from the corresponding arguments first and last to return a list of suggested email addresses that follow the convention of containing the first name, followed by a full stop and then the last name and finally the domain.
ArrayList handling
Write a method called fiveASideSelector that takes an ArrayList
ArrayList inserts
Imagine you are designing a program to help organise a queue of people arriving and leaving a dental clinic waiting room. People should be called up to see dentist in the order that they arrive. Write a method called arrival that takes an argument containing the new arrival’s name and adds their name to the queue (a list of names). Also write a function called next patient that takes an integer argument called position. This function should return the name of the person in the given position in the queue or return the name of the person that is next in the queue if no argument is provided for position. You should make sure that names of people that have been returned by the next patient function are removed from the queue. The method should be declared in a class called DentistWaitingRoom.java.
Create array of objects for the project
- Initialise a static ArrayList of shapes in a class called GameLogic. Declare four Wall objects that form the shape of a square when ‘painted’ and add them to the list.
- Create two a Paddle objects that are placed on each side and create a Ball object that is placed in the middle. Add these Shape subclasses to the list in GameLogic.
- Update the paint method to iterate over all objects in GameLogic.
Key Points
Object-oriented programming is a programming paradigm that uses abstraction (in the form of classes and objects) to create models based on the real world environment
Packages and the Software Development Lifecycle in Java
Overview
Teaching: 60 min
Exercises: 0 minQuestions
How do we use packages in Java?
How can we control the build environment?
How do we produce well documented code?
Objectives
Understand how to define effective packages.
Provide a structure for well documented code.
Key Points
The software development lifecycle in Java provides a framework for reliable, performant and professional production of code.
Software reliability in Java - Testing and Exceptions
Overview
Teaching: 60 min
Exercises: 0 minQuestions
How do we use tesing in Java?
How do we use exceptions in Java?
Objectives
Explain the assertion and fault tolerance are built into software design.
Provide examples to demonstrate how JUnit implements unit testing in Java.
Group Project
Pong is a game like pinball centred around a ball bouncing around the screen and the player has to keep the game ‘live’ for as long as possible using the paddle which can be moved side to side at the bottom of the screen and bounces the ball back into play off the side and top walls. If the ball reaches the bottom of the screen and passes the paddle the game ends.
Pong is an ideal game to implement with objects because it applies many of the constructs we’ve used so far in a tangible way. We’re going to tackle developing this game in three phases. Each phase will require your team of four to split into pairs and practice paired programming.
- Visualise the shapes.
- Make the ball move.
- Create the rules of the game.
Start by creating a new project that you all have access to and create a place for shared source code. Ideally this would be a source controlled project on a public hosting site like Github but for the interest of time OneDrive or any fileshare system will work fine.
Visualise the Shapes
Split into two pairs; two people will write a TestRectangle, TestCircle and TestMain classes and the others will write the Rectangle and Circle classes. The instructions for the classes are provided the tests will need to be created as you think appropriate but stick to Junit 4 as this is what was taught in the slides.
First we will need to create the shapes. The game will remain as simple as possible so we’ll just need Rectangles and Circles. Use inspiration from the previous projects you’ve built but create new abstract Shape class and concrete Rectangle and Circle classes. Only add the height, width and position attributes for now (and the constructors and getters/setters); don’t worry about implementing overlaps as that will come later.
Once you’ve create the abstract shape classes, create a separate Main class that contains an ArrayList of Shapes then create some four Reactangles and one Circle before adding them to a static ArrayList of Shapes with an identifier gameObjects. Once you’ve done this print out the properties of the Shapes using the toString() method. Remember, your IDE will generate a better toString method if you right-click generate and select all class attributes.
The printed information is useful but not visual enough for gameplay. Combine back together as a team and use the two classes below to help you visualise the Shapes ArrayList that you created in the Main. Create a UI class and a PongCanvas class in your project. Adjust the size and position of the gameObjects so the four Rectangles create a box around the edge of the window.
package mcollison.pong;

import javax.swing.JFrame;
import java.awt.Dimension;
import java.awt.event.KeyEvent;
import java.awt.event.KeyAdapter;
/**
 * A class containing the user interface components to enable keyboard inputs and display of the graphics through a
 * configured window.
 * @author Matt Collison
 * @version 1.0
 */
public class UI {
    PongCanvas canvas;// the custom drawing canvas (class extends awt Canvas)
    JFrame frame;
    public UI() {
        canvas = new PongCanvas();
        canvas.setSize(400, 410);
        frame = new JFrame("Pong");
        frame.setPreferredSize(new Dimension(400, 400));
        frame.add(canvas);
        frame.pack();
        frame.setVisible(true);
        frame.setDefaultCloseOperation(JFrame.EXIT_ON_CLOSE);
    }
}
package mcollison.pong;

import java.awt.Canvas;
import java.awt.Graphics;
/**
 * A class extended from awt Canvas to handle the drawing of graphics.
 * @author Matt Collison
 * @version 1.0
 */
public class PongCanvas extends Canvas {
    /**
     * The paint method displays the objects on the first frame.
     * @param g the graphics object integrated in the UI from awt.
     */
    public void paint(Graphics g) {
        for (Shape s : Main.gameShapes){
            if (s instanceof Rectangle) {
                g.fillRect(s.getPosition()[0], s.getPosition()[1],
                        s.getWidth(), s.getHeight());
            } else if (s instanceof Circle) {
                g.fillOval(s.getPosition()[0], s.getPosition()[1],
                        s.getWidth(), s.getHeight());
            }
        }
    }


}
Make the ball move
At this stage you should have something that looks like frozen pong without the paddle. The next challenge is to make the ball move. TO achieve this we’ll create a Movable interface and a sublass of Circle called Ball that implements Movable.
First create the Movable interface that declares a move method. An example is provided below.
package mcollison.pong;

/**
 * An interface to note objects that move and change direction on collisions.
 * @author Matt Collison
 * @version 1.0
 */
public interface Movable {
    /** A method that will be called on each game loop. */
    public void move();
}
Next, implement that Movable interface in Ball. The class declaration is provided below. Continue to implement the move method within Ball, note you will need to update the position attribute of the super class from the move method and the amount you change affects the speed and direction of the ball - check back at the dimensions of the canvas for a hint on scale.
public class Ball extends Circle implements Movable
Once you have the move method implemented it’s time to make an animation. Add the method below to your PongCanvas class.
    /**
     * The render method calls the 'move' method and creates the graphic for all Movable objects in their new
     * position using the java.awt.Canvas repaint method.
     */
    public void render() {
        for (Shape s : Main.gameShapes){
            if (s instanceof Movable ){
                repaint(s.getPosition()[0], s.getPosition()[1],
                        s.getWidth(), s.getHeight()); // Clear old area to background
                ((Movable) s).move();
                repaint(s.getPosition()[0], s.getPosition()[1],
                        s.getWidth(), s.getHeight()); // Add graphic at new position
            }
        }
    }
The render method uses the repaint method to update the onscreen graphic of your objects after it has been move() d. The problem, however, is that the render method needs to be called each time you want a new frame. This loop is sometimes called the game loop. Update the main method in your Main class to render the Movable objects after a 50 millisecond delay.
        while (true) {
            try {
                //A hard delay between frames
                Thread.sleep(50);
                //move objects and render next frame
                ui.canvas.render();
            } catch (Exception e) {
                e.printStackTrace();
            }
        }
At this stage you should have a stationary box made from four triangles and a ball drifting across it. Well done you’ve made the ball move. Next we need to process the physics of collisions.
Create the rules of the game
The key part of the game that is missing is setting the rules for how game objects interact with eachother. At this stage hopefully you will recognise that we need to consider is any of our shapes collide. Implement the overlaps method in Rectangle and Circle. Note, you will likely want to assume a ‘bounding box’ for circle interactions. Assuming the rectangles don’t tile we can assume a circle will overlap at the same point as it’s bounding box. Alternaticely you can use the instanceof method to detect the nature of the comparitor Shape.
Once you have an overlaps method you’ll want to revisit the game loop in the Main class. Add a for loop that detects if any objects overlap and prints out the details of overlapping objects. Note you might want to restrict the checks to Movable objects interacting with all objects rather than repeatedly checking on non-movable objects.
At this stage the ball collisions with the wall should be detected but no action is taken. Clearly we want the ball to bounce off the walls but we don’t have a mechanism to change the behaviour of the move. Add a direction attribute to Shape so all instances of shapes have it and use this attribute in move(). Now, when a collision is detected update the direction attribute. Note, you will need to know where the collision has taken place to be able to change difection of the moving object in the correct way.
Now we finally have the ball bouncing around the window. However there is no user input, no paddle and no way to win or lose. Add a Triangle called paddle. Use a method like the one below which you should add to your UI class to change the position of the paddle object. Consider if the paddle should be Movable as it could bounce itself off the screen. Make sure paddle is added to the gameObjects else it will not be included in the collision detection.
    /**
     * A private subroutine called only from within the constructor to isolate the logic behind keyboard inputs.
     * @param game contains all the game objects and physics objects including those that can be controlled by the user.
     */
    private void keyboardInput(GamePhysics game){
        frame.addKeyListener(new KeyAdapter() {
            @Override
            public void keyPressed(KeyEvent evt) {
                switch (evt.getKeyCode()) {
                    case KeyEvent.VK_LEFT:
                        canvas.repaint(game.paddle.getPosition()[0],
                                game.paddle.getPosition()[1],
                                game.paddle.getWidth(),
                                game.paddle.getHeight());
                        game.left();
                        canvas.repaint(game.paddle.getPosition()[0],
                                game.paddle.getPosition()[1],
                                game.paddle.getWidth(),
                                game.paddle.getHeight());
                        break;
                    case KeyEvent.VK_RIGHT:
                        canvas.repaint(game.paddle.getPosition()[0],
                                game.paddle.getPosition()[1],
                                game.paddle.getWidth(),
                                game.paddle.getHeight());
                        game.right();
                        canvas.repaint(game.paddle.getPosition()[0],
                                game.paddle.getPosition()[1],
                                game.paddle.getWidth(),
                                game.paddle.getHeight());
                        break;
                    case KeyEvent.VK_B:
                        game.gameShapes.add(
                                new Ball(10, new int[]{50, 50})
                        );

                }
            }
        });

    }
Now you will have a controllable paddle and the game is starting to ressemble Pong but you’re missing a win or lose state. Create a new Rectangle called endZone and change the collision detection so that if ednZone is overlapping a movable object the game loop breaks and the game stops.
if ( s2 instanceof Paddle ){
  points++;
}
if ( s2 == endZone ) {
  return false;
}
At this stage you should have a functional application that runs pong. Congratulations!
Consider the following extension challenges:
- try to extend the game to enable points to be calculated by how many times you bounce the ball back into play (there is a hint in the code above).
- Speed up the game by changing the delay and size of the move steps.
- Add additional balls when B is pressed during gameplay.
I hope this workshop is satisfying and you reach the reward of making your own Pong application. If you didn’t, here’s one I made earlier… solution link
Key Points
The software development lifecycle in Java provides a framework for reliable, performant and professional production of code.